It never ends, I am knee deep into a project, and a realize I need something to complete the project that I do not currently have.
I've ripped out the old ceiling fan (a brass and white carcass, I might add, circa early 1990's) and only the old bracket remains still stuck in the ceiling. I removed one of the two screws holding the old bracket in...
and the other one won't budge.
I try the screwdriver,
I try the now charged cordless drill on reverse...with NO success.
I need a man.
I need a man with man like muscles to remove this screw, but he is out of town. I have to, once again, put the brakes on this project until my man returns from out of town.
That was mid July.
It is now mid August, and my man has been home for a month of Sundays and still has to remove this screw from the bracket. This is a prime example of why I am the one who tackles any projects around this house. My man has zero motivation for home improvement. If it works, it is fine and if it doesn't, that's okay too, but we might need to "call somebody".
So today, my man says to me "Is there anything we NEED to do today", and I say "YES, please get that screw outta the fan bracket" (for the 10th time in 4 weeks)and he says to me...
"What bracket?"
Hopefully, my next post will announce the successful installation of said ceiling fan...
Until I realize I need something else to complete this project.
Sunday, August 16, 2009
Tuesday, July 21, 2009
While the Cat's Away the Mice will...Upgrade the Light Fixtures
The Cat works from home. He needs his computer(s), his DSL, his phone, his task light, his air conditioning, and at feeding time, he needs the microwave and a cold drink. All of which requires electricity. For a few short days he is taking care of business out of the house...this is a VERY rare ocassion and one that must be taken advantage of. The mice will use this opportunity to cut the power and upgrade the light fixtures to avoid disruption in the Cat's normal routine.
I had the fixtures picked out and knew exactly where to get them. I was only replacing flush mount hall lighting fixtures for a total of 6 on three floors. I had enough time to tackle the first installation today and it was not without issue.
I removed the old fixture and pulled the new fixture from the box. Old fixture had a single black wire, a single white wire and a ground. New fixture has two black wires, two white wires, and a ground. After a complete review of the instructions in four languages, nothing explains what to do in this situation with the extra black and white wires.
I go to get on the internet to find the answer to my issue and the DSL...has no power.
I was reminded of the time the Cat, who's education is in Electrical Engineering, installed his first ceiling fan. We flipped the power on after installation and sparks and smoke rolled out of the fan.
Taking maters into my own hands and relying on my own intuition, I connected ALL the white wires together, and ALL the black wires together, and connected the grounds. By this time, it was 80 degrees upstairs with no AC. I knew the Cat would be whining if he was home, yes, this was a much better idea to not have him around while I attempt this DIY project in the middle of summer.
I flipped the power back on and voila, no sparks, no fire, just light. But my subconcious would not leave it alone. What if the fixture overheats and starts a fire at some point?
With the power back on, I searched the internet for answers. I searched, and searched, and searched. I found no answers to the question "What to do with extra wires", "multiple wires", "installing a light fixture" and every combination in between. The internet was very disappointing.
I did find something interesting though, www.justanswers.com. This is a web portal where you type in your question, your email address, and you submit with the notion that there are electricians online right at this moment who will immediately answer your question and email you the answer. Wrong notion.
I submitted my question only to discover that I was then prompted to "bid" on the answer.
WTF?
You mean like "Priceline"? YES! Like Priceline, I "bid" on what I would pay for a satisfactory answer to my question. My choices were A) $9, B) $39, or C) $69. I thought "Are you kidding me?"
Justanswers.com is not "Just Answers", it is just a scam. I am an information "seeker", not an information "payer". I am "seeking" information, not an education, MBA, PHD for which I would gladly pay for. But that's not all...
As I abandoned the web page that wanted me to bid on what I would pay for a satisfactory answer, it of course tried to stop me from maneuvering away from the page. I quickly checked my email and in the time it took me to submit my question, to the time I abandoned the site, Justanswers.com had emailed me three times. None of which, was of course, a free answer to my question.
Still not finding the information on the web, I turned to the fixture's instruction manual where I found a customer service phone number. Amazingly enough, I immediately got someone on the phone, I posed my wire question, she confirmed I had in fact installed the fixture properly.
What a relief.
Now, about that installation manual.
How come it is printed in 4 languages, but it does not tell me what to do in this instance with multiple wires?
Dead silence from the customer service representative.
She doesn't know, and she really doesn't give a flip.
I guess you have to take the good with the bad.
One fixture down, 5 more to go.
Saturday, July 18, 2009

Sunday, March 1, 2009
Grill Finale
 Once I hurdled the rusted remnants, lacking parts, and seriously inept instructions I had to give the grill a good cleaning.
A quick search on the Internet proved no information for cleaning a stainless steel grill. Pathetic. There is tons of information, opinions, blogs, and home improvement web sites out there but rarely any proven real answers to real questions.
I  read that you could "pressure wash" the grill! Why in the world would anyone do this? There is way too much power in those machines for a grill. A popular queen of clean said I could take aluminum foil and clean the grill, no, I definitely needed more power than that. Other suggestions included using Dawn Dishwashing Liquid. Would you use dish soap to clean the inside of your oven?
 read that you could "pressure wash" the grill! Why in the world would anyone do this? There is way too much power in those machines for a grill. A popular queen of clean said I could take aluminum foil and clean the grill, no, I definitely needed more power than that. Other suggestions included using Dawn Dishwashing Liquid. Would you use dish soap to clean the inside of your oven?
 And then it occurred to me. Oven cleaner.
I sprayed the inside of the grill, minus the new parts, with oven cleaner, and after a few hours, I wiped it off to uncover 95% of the stainless steel grill.
The oven cleaner is not recommended for use on the grill...
but it totally worked!
The only thing I would recommend is in no way turn on the gas on the grill and I would not recommend allowing the cleaner to drip onto the lettering around the knobs and such. The cleaner will eat this delicate stuff right off. Also protect the patio or deck that your grill sits on from cleaner drips.
After cleaning the grill, replacing the burners, the cooking grate and the rusted out knobs, the grill looks almost brand new.

I lit it up...
and we have fire...
contained fire....
perfect fire for the first burger of the season!
Friday, February 20, 2009
Grill Continued...
Alright, maybe I'm not as smart as I think I am. Apparently, I need a "stainless steel" nut and screw...which, I'm told, will not rust. Not galvanized like previously thought.
I went to the warehouse today, and had two associates and one customer "helping" me decide what I needed.
I think the screws I ripped out of there yesterday were stainless steel though. I'm probably back a square one again...see previous post ;-(
I went to the warehouse today, and had two associates and one customer "helping" me decide what I needed.
I think the screws I ripped out of there yesterday were stainless steel though. I'm probably back a square one again...see previous post ;-(
Thursday, February 19, 2009
Resurrecting the Grill
Resurrecting the grill is an adventure into the world of "man made crap". Today, I took that adventure and true to my theory of "man made crap" the adventure was painful, annoying, expensive and unable to be completed in a single day.
Man made crap is what I assign to things that are severely flawed in their design, requiring unbelievable time, attention, and resources to make work with the bottom line b eing, if more thought had gone into the original, man made design...I would not be wasting my time right now.
A once beautiful, shiny stainless steel grill is now a shadow of its former self. The grilling grates have rusted through and literally split. The three iron burners have rusted so badly that literally all that remains is dust.
Rust dust.
Who did we entertain last and might they have noticed the shame in this grill?
How toxic is rust?
I started pulling whole pieces of refuge out of the grill. Burner parts, grate parts, chicken parts...

I got to the bottom of the grill, trying to contain the fierce mess with a trash can by my side and I discovered a "bar". This "bar" ran from one side of the grill to the other and apparently, in its glory days, supported three burners for proper air circulation.
This bar was attached with screws...
Screws that had rusted to the side of the grill,
With a rusted nut attached.
Securely rusted for all eternity.
With garden gloves on and eye protection, (because I remember one time my dad got a piece of metal in his eye and we spent HOURS in the emergency room over the rust in his eye...probably another adventure in man made crap decades ago...)
I started pulling, no give. I got the screw driver, nowhere to torque it. Completely rusted through. And now the relay starts. The relay is to the garage and back, with a different tool in tow each time.
I brought back my dremel, battery not charged, can't find charger. Back to the garage.
I brought back my drill, attached dremel parts and tried to cut the screws, won't reach.
I brought back a file I found. File won't file. Back to the garage.
Cussing like a sailor, swearing the man made crap, I pull some more.
One side of the bar broke loose!!!! Free at last! Free at last!
This is probably the best time to tell you I have "smarty pants dance"...and now I'm doing the smarty pants dance...
Why would any "one" design any replacement part with an attachment that is exposed to water and humidity out of a metal that rusts? Why? Why not pay attention and make that particular screw galvanized? We humans have a metal coating that is strong and does not rust and it is called galvanized! Use it!
I went to lunch...my lunch date was my friend Anita who was a college roommate of mine and I hadn't seen her in 16 years!
I stopped at the "warehouse" on the way home, had a discussion with a guy in the tool department. We mourned my dremel together, because he had a perfect part I could've used for my dremel to cut that last rusted screw out. He recommended I used my jig saw, attach a metal blade and cut the screw out. So for only $4.24 in jig saw blades, I was on my way.
Back to the relay, got the jig saw, battery, and charger. Set up to charge since the stupid thing is cordless and takes 24 hours to charge for 5 minutes of sawing battery juice. Another man made piece of crap.
I set to cleaning up the rest of the grill, giving it a good scrubbing to prep it for all the new shiny grill parts I was going to install. Dreaming of the first cheeseburger, and first BBQ of the season, who should we have over? Hmmmm.....
A few hours later, I prematurely put the jig saw together. I knew I didn't have much charge on the battery, probably 30 seconds of sawing, so I took position and set to the screw. Like predicted, I only got 30 seconds of good jig saw before the battery died. I had no patience for this.
I relayed back to the garage, grabbed the drill, loaded a drill bit. Pulled the grill over to the closest outlet and laid the drill into the phillips head end of the rusted screw as hard and as fast as I could.
I beat the screw up pretty bad, gave a few pulls on the remainder of the bar and it broke free!
Free! Free!
Smarty pants dance here.......
Now, I started the deciphering the cryptic scrawl of the replacement parts printed instructions...Really...they couldn't do any better than these instructions? Man made crap.
I get the bar completely assembled and I work on attaching the replacement to the grill. Except. Wait a minute. Hold up. There's no replacement screw to hold the replacement bar? You've GOT to be kidding me. Unbelievable.
Man made piece of crap.
That's okay, I'm going out tomorrow and buying two galvanized screws and two galvanized nuts...
Me woman.
Smarty pants dance.
;-)
Materials: $254.24 so far.
Check out http://www.grillparts.com/
Man made crap is what I assign to things that are severely flawed in their design, requiring unbelievable time, attention, and resources to make work with the bottom line b
 eing, if more thought had gone into the original, man made design...I would not be wasting my time right now.
A once beautiful, shiny stainless steel grill is now a shadow of its former self. The grilling grates have rusted through and literally split. The three iron burners have rusted so badly that literally all that remains is dust.
Rust dust.
Who did we entertain last and might they have noticed the shame in this grill?
How toxic is rust?
I started pulling whole pieces of refuge out of the grill. Burner parts, grate parts, chicken parts...

I got to the bottom of the grill, trying to contain the fierce mess with a trash can by my side and I discovered a "bar". This "bar" ran from one side of the grill to the other and apparently, in its glory days, supported three burners for proper air circulation.
This bar was attached with screws...
Screws that had rusted to the side of the grill,
With a rusted nut attached.
Securely rusted for all eternity.
With garden gloves on and eye protection, (because I remember one time my dad got a piece of metal in his eye and we spent HOURS in the emergency room over the rust in his eye...probably another adventure in man made crap decades ago...)
I started pulling, no give. I got the screw driver, nowhere to torque it. Completely rusted through. And now the relay starts. The relay is to the garage and back, with a different tool in tow each time.
I brought back my dremel, battery not charged, can't find charger. Back to the garage.
I brought back my drill, attached dremel parts and tried to cut the screws, won't reach.
I brought back a file I found. File won't file. Back to the garage.
Cussing like a sailor, swearing the man made crap, I pull some more.
One side of the bar broke loose!!!! Free at last! Free at last!
This is probably the best time to tell you I have "smarty pants dance"...and now I'm doing the smarty pants dance...
Why would any "one" design any replacement part with an attachment that is exposed to water and humidity out of a metal that rusts? Why? Why not pay attention and make that particular screw galvanized? We humans have a metal coating that is strong and does not rust and it is called galvanized! Use it!
I went to lunch...my lunch date was my friend Anita who was a college roommate of mine and I hadn't seen her in 16 years!
I stopped at the "warehouse" on the way home, had a discussion with a guy in the tool department. We mourned my dremel together, because he had a perfect part I could've used for my dremel to cut that last rusted screw out. He recommended I used my jig saw, attach a metal blade and cut the screw out. So for only $4.24 in jig saw blades, I was on my way.
Back to the relay, got the jig saw, battery, and charger. Set up to charge since the stupid thing is cordless and takes 24 hours to charge for 5 minutes of sawing battery juice. Another man made piece of crap.
I set to cleaning up the rest of the grill, giving it a good scrubbing to prep it for all the new shiny grill parts I was going to install. Dreaming of the first cheeseburger, and first BBQ of the season, who should we have over? Hmmmm.....
A few hours later, I prematurely put the jig saw together. I knew I didn't have much charge on the battery, probably 30 seconds of sawing, so I took position and set to the screw. Like predicted, I only got 30 seconds of good jig saw before the battery died. I had no patience for this.
I relayed back to the garage, grabbed the drill, loaded a drill bit. Pulled the grill over to the closest outlet and laid the drill into the phillips head end of the rusted screw as hard and as fast as I could.
I beat the screw up pretty bad, gave a few pulls on the remainder of the bar and it broke free!
Free! Free!
Smarty pants dance here.......
Now, I started the deciphering the cryptic scrawl of the replacement parts printed instructions...Really...they couldn't do any better than these instructions? Man made crap.
I get the bar completely assembled and I work on attaching the replacement to the grill. Except. Wait a minute. Hold up. There's no replacement screw to hold the replacement bar? You've GOT to be kidding me. Unbelievable.
Man made piece of crap.
That's okay, I'm going out tomorrow and buying two galvanized screws and two galvanized nuts...
Me woman.
Smarty pants dance.
;-)
Materials: $254.24 so far.
Check out http://www.grillparts.com/
Wednesday, February 18, 2009
10 Years Newer
Wear and tear on a house can decrease its aesthetics and its value. However, "value" is a relative term. In today's real estate market homes are losing value quickly, but don't lose sight of value just yet. When an appraisal is done on a home for purchase or refinance, the appraiser rates the house on how well it aesthetically has been maintained and assigns an age to it, this is added to their "matrix of other considerations" and they assign a "market value" for the home, this is the basis for the home's value.


Renewing just a few inexpensive things in an home of just about any age can easily add value to a house. So whether you want to give your house a facelift, or get it ready for the extremely tough real estate market, want to uncover it's true potential, make it more comfortable, or dare I say compete with new construction homes on the market, here is my "top must updates" that I am doing in my house.
~Check out baseboards and moldings. Mine were showing wear and tear from shoes, the vacuum cleaner, dirt/dust, gas heat, and changing levels of humidity in a house. One of the best was to identify this is if the baseboard or molding has been pulled away from the wall showing cracks in the paint. The crack is most likely caused by painters calk that is used to seal the space between the wall and the carpentry and has pulled apart. This is an easy and cheap update, cut out the old calk with a blade, replace it with new painters caulk, smooth with your finger. When dry, tape and repaint or retouch as needed. I certainly don't endorse products, because I'm not getting paid to ;-), but I like ALEX caulk that is paintable, flexible, has water clean up, comes in it's own "squeeze cheese" like tube, and has a 35 year warranty. No caulk gun needed.
~Light switch covers, outlet covers, and register covers in the floor or in the ceiling show a home's age. Even light switches themselves can get old, dirty or broken and are so inexpensive to replace. Sometimes all you have to do is give the covers a wipe down, other times they just need to be replaced. I've replaced most of the switch covers and outlet covers in my house because they were yellowed, cracked, paint smeared or just plain worn. Metal register covers could use a wipe down, then I usually spray them with a fresh coat of spray paint and they look like new. I had somebody ask me one time, "why don't you just buy new ones?" and I thought about it and I really didn't know why I just didn't buy new ones. I guess because spray paint is cheaper, and I'm recycling the old ones so the registers don't end up in the landfill.
~Renew stained carpentry or stained wood cabinets. There are some very expensive and  professional "wood renewal" systems out there which are all options. However, I was able to bring my amber stained cherry cabinets in my kitchen back to new with a little known wood product called "Howards". It is sold in Home Depot only, and it has a stain renewal treatment and a wax treatment. My cabinets were scratched and on the edges were showing wear and tear of the poly coat, and replacing them was not an option. I used the stain treatment to cover the scratches and the wax treatment to moisturize the wood. All my issues went away and the cabinets look almost brand new. Of course, the other options include refinishing and painting them. I've seen some horrible painting and refinishing jobs done on cabinets, so take care to educate yourself on cabinet DIY if you are going to attempt a project like that.
 professional "wood renewal" systems out there which are all options. However, I was able to bring my amber stained cherry cabinets in my kitchen back to new with a little known wood product called "Howards". It is sold in Home Depot only, and it has a stain renewal treatment and a wax treatment. My cabinets were scratched and on the edges were showing wear and tear of the poly coat, and replacing them was not an option. I used the stain treatment to cover the scratches and the wax treatment to moisturize the wood. All my issues went away and the cabinets look almost brand new. Of course, the other options include refinishing and painting them. I've seen some horrible painting and refinishing jobs done on cabinets, so take care to educate yourself on cabinet DIY if you are going to attempt a project like that.
~Repair grout or tiles in bathrooms, kitchens, etc. There are a lot of solutions for grout restoration. Sometimes just bleach or Oxyclean can bleach a light colored grout to new again. Cracked grout should be removed and replaced. There is a grout removal tool that is sold separately for Dremel and I understand this is the best deal on the market for tackling crumbling grout. I have white tile with white grout in my mud room, yes, I said "MUD ROOM". While I don't think I want to tackle removing the tile, grout, and backerboard and redoing it, I do think my next project will be to remove the white grout and refinish it with a beige or grey grout because the white is so completely discolored. More on that project at a later date! :-)
~This is an easy one, repaint. A fresh coat of paint on walls, trim and ceilings is very inexpensive and a huge impact. For older homes, I use a scrubbable flat paint on the walls. I use a good quality paint too, I NEVER use any paints that can be purchased at Lowes or Home Depot, I have not found them to be good quality paints that can withstand the wear and tear on the inside of a house. If you have a gloss finish on anything on the inside of your house, and you want to update your house, prime it and paint it and bring the reflectivity down.
~Restore floors. I'm not talking about having floors refinished just yet. If that is in the budget, great, go for it and replace carpet with a good padding and good floor, sometimes all it takes is a good carpet cleaning to take years off carpets. Have the carpets stretched if that's all it takes to bring your floor back. I have hardwood floors throughout my home and I have seen people actually cringe when I tell them what I use on my floors to keep them shiny and new. I use Murphy's Oil Soap. The oil hydrates the wood and provides a protective coating and makes them glow. It also temporarily seals worn floors. I never get any build up of oil because it is broken down with the dry air in the house and rubbed off by foot traffic. I never recommend using any kind of acidic household cleaner on wood floors that eats away at the poly finish and creates a haze on the floor.
~Small, but more expensive updates to shave years off a house include updating light fixtures, or adding vintage ones, as well as updating bathroom fixtures, and replacing doors or knobs on doors and knobs on cabinetry.

~Bury the traditional wallpaper. I haven't found a single more daunting thing that dates a house more than wall coverings. I have seen some very inovative coverings that look very nice, but for me, if it is a border or a whole wall extravaganza of some body's repeating artwork, it makes me cringe. I like to tell people the first thing I did to update my dated kitchen was to rip down the "rainbow plaid" wallpaper that was in my kitchen when we first moved in. We were stuck with two houses at the time, and four mortgages and didn't have a dime to put into our "new" house. It didn't take me a dime to get that rainbow plaid wallpaper down so I could actually stand to have coffee in my "new" kitchen.
~And finally the number one, super duper, inexpensive update I've done to make my house look years and years younger is an awesome clean up and clean out. By just scrubbing walls, doors, windows inside and out, as well as baseboards and floors can make a house look much newer and very cared for.
I hope you found something here, if not just motivation, to do something to make your digs look renewed. ;-)
Tuesday, February 17, 2009
Lessons from Hiring a General Contractor
Flashback one year ago today, I was gathering bids for a masterbath remodel. I hadn't planned to remodel anything major in the house until the kitchen was morphed into this decade. I brought in general contractor after general contractor to "do the drill" of job estimating for time and materials.
By the time I settled on hiring a this contractor, I spent three months interviewing and pricing the project. Cracking and shifting tiles in the master shower, made the shower pan take on water. Water meant mold lurking in my walls. It had to be redone, and I had to find the right contractor to do it. Since this project was not my focus, I didn't want to throw a ton of cash into it. My eye was set on the kitchen, so I hired the contractor that gave me a competitive labor price, who said we could do a "partial" remodel and keep costs down.
That was the beginning of a 7 month long battle with said general contractor to get the job done to an acceptable level and blew the entire bath budget as well as the kitchen budget. In the end, we had to completely demolish my masterbath three times for shoddy workmanship. Sure, all the references checked out, the insurance checked out, BBB checked out, and I was in renovators' hell. Since this is a flashback, I can now list all the things that I learned from this project...
1. I will never again attempt to hire out any remodel that involves the word "partial". Tile is like icing, you can't partially tile a cake and have it look right. You can't blend two different types of icing and have it look right and you can't add old icing to new icing.
2. I will research, get information on the internet, from friends, from the trades, and books. Educating yourself on the entire remodel will keep you from being "had" and it will also keep "change orders" to a minimum which in turn drive up the cost of the project and delay an already undercalculated timeline.
3. I will never give a "draw" for something that isn't totally complete and to my satisfaction.
4. The draw schedule will match the job schedule (yes, this was an issue)
5. My sales guy will never be my general contractor again, a guy who knows sales does not know construction.
6. My next general contractor will babysit the subcontractor that he hires to perform the work, I will not babysit on my dollar and my time.
7. Always budget for it costing twice what you think it is going to cost, inevitably, something goes strangely wrong and ends up costing more money.
8. Shop my own materials, if the contractor gives me the name of somebody to use, he is getting a kickback and I never get a discount.
9. Put everything in writing in a contract, study the contract, apply the contract, and have the contract in hand every time there is a conversation with the GC.
10. Never accept the words "we'll just do this...to patch that" NEVER.
And finally...
I learned I can do a better job and for a lot less money if I do it myself. ;-)
Thursday, January 29, 2009
Tiling the Backsplash
I watched it done on TV, I even read books at my local library and they all made tiling seem way more complicated than it actually is. Seriously doubting my ability to do this project, I measured for my materials and purchased the tile product. I chose a ceramic 6 inch tile that is mottled in its finish with variations in color and texture. I also chose a premixed grout in a tone on tone color.
Premixed grout is about 5 times more expensive than unmixed grout, but to me it was totally worth the money. I didn't want to have to schlep a huge bucket of grout, get the consistency just right, and have grout powder flying everywhere. If I ever do another tile project, it will be with pre-mixed grout again.
I also purchased a small, inexpensive wet tile saw as well as a tiling kit (nippers, spacers, sponge, float, etc), and tile adhesive. The tile I chose had regular tiles, decorative tiles, and a single type of bullnose pieces. I had already calculated how many of each I would need taking care to try to get the same dye lot. Huge variations in color can happen between dye lots and I did experience this with the tile I chose.
In all my research, trial and error in the masterbath remodel, I did learn that I needed a bullnose tile for an edging and a field tile. I also chose a precut decorative tile for an accent around the backsplash. With all my materials stocked, it was time to get started.
This was a working kitchen during the entire remodel. This is possible if you are either 1) doing the remodel yourself or 2)acting as your own general contractor. I was both. Sort of. So I removed the items from the counter and switch plates and worked in sections at a time. I laid out my tile and decided where I needed to make cuts with my new wet tile saw ;-).
Immediately, I discovered that the switch and electrical cut outs were going to be very challenging with my level of skill and the saw I was working with. Laying the bottom row was a real confidence builder. I was laying off granite countertop that did not have a slab backsplash. I spaced the tile between the granite and the first tile (this is not the space you grout, I will cover this later). My first row proved only a very small cut. Tiling is a science in the fact that you have to measure the cuts to be made, but it is also a visual art. When looking at the field to be laid, a full tile should start at the bullnose and work in. For example, a full bullnose tile would be on the edge of the countertop by the door and as the tile works the opposite direction, lay full tiles until you get to the cut in the corner or adjacent wall.
I would highly recommend eye protection and a towel to dry yourself off when using the diamond blade tile saw. Chips of tile and water flies everywhere. In cutting the tile around the switches, I had to make some cuts with the saw and then finish up with the tile nippers. I learned that the less you take on with the nippers the better. Let the saw do as much work as possible. Also on the switch plates, you must unscrew the plate attached to the wall, lay the tile underneath the actual switch plate and reattach the switch plate to the junction box. If you do not do this and you tile over the switch plate, you will not be able to reattach the switch plate cover. Shut off the electricity if you are not familiar with working with live switch plates and wall sockets.
Since I laid out all the bullnose, field tiles, and accent tiles first, made cuts second, and laid rows of adhesive next. The first section went very quickly. I let it dry overnight, and started on the grout in the section of tile that I laid the day before. Again, since this was a working kitchen, we were actually trying to live in it during the renovation, I wanted to lay tiles and grout them and move on to the next section.
Float the grout at a 45 degree angle across the tiles and fill all spaces. Unsightly bubbles will surface if the grout is too wet, and if that is the case, it will have to dry and go back for a second grout coat or touch up. I used a 1/8 of an inch grout space which was challenging to push the grout into the gaps. The final challenge with the grout proved to be the cleaning. I had to clean light enough not to pull the grout out of the spaces and hard enough to clean the grout out of the divots on the tiles.
Finally, I used a matching sanded grout calk between the tiles and the granite and the tiles and the wall. These areas receive a lot of expansion and contraction, they also may get wet so they provide a waterproof, flexible seal between the tile and the granite. This is a very tricky and messy product, so having wet paper towels and working with a wet finger on the bead of calk is the best advice I can give. The calk product does not cover very much square footage, so buy more than you think you will need. See the pics of the finished project!
DIY project cost: $500 tile and materials.
Premixed grout is about 5 times more expensive than unmixed grout, but to me it was totally worth the money. I didn't want to have to schlep a huge bucket of grout, get the consistency just right, and have grout powder flying everywhere. If I ever do another tile project, it will be with pre-mixed grout again.
I also purchased a small, inexpensive wet tile saw as well as a tiling kit (nippers, spacers, sponge, float, etc), and tile adhesive. The tile I chose had regular tiles, decorative tiles, and a single type of bullnose pieces. I had already calculated how many of each I would need taking care to try to get the same dye lot. Huge variations in color can happen between dye lots and I did experience this with the tile I chose.
In all my research, trial and error in the masterbath remodel, I did learn that I needed a bullnose tile for an edging and a field tile. I also chose a precut decorative tile for an accent around the backsplash. With all my materials stocked, it was time to get started.
This was a working kitchen during the entire remodel. This is possible if you are either 1) doing the remodel yourself or 2)acting as your own general contractor. I was both. Sort of. So I removed the items from the counter and switch plates and worked in sections at a time. I laid out my tile and decided where I needed to make cuts with my new wet tile saw ;-).
Immediately, I discovered that the switch and electrical cut outs were going to be very challenging with my level of skill and the saw I was working with. Laying the bottom row was a real confidence builder. I was laying off granite countertop that did not have a slab backsplash. I spaced the tile between the granite and the first tile (this is not the space you grout, I will cover this later). My first row proved only a very small cut. Tiling is a science in the fact that you have to measure the cuts to be made, but it is also a visual art. When looking at the field to be laid, a full tile should start at the bullnose and work in. For example, a full bullnose tile would be on the edge of the countertop by the door and as the tile works the opposite direction, lay full tiles until
 you get to the cut in the corner or adjacent wall.
I would highly recommend eye protection and a towel to dry yourself off when using the diamond blade tile saw. Chips of tile and water flies everywhere. In cutting the tile around the switches, I had to make some cuts with the saw and then finish up with the tile nippers. I learned that the less you take on with the nippers the better. Let the saw do as much work as possible. Also on the switch plates, you must unscrew the plate attached to the wall, lay the tile underneath the actual switch plate and reattach the switch plate to the junction box. If you do not do this and you tile over the switch plate, you will not be able to reattach the switch plate cover. Shut off the electricity if you are not familiar with working with live switch plates and wall sockets.
Since I laid out all the bullnose, field tiles, and accent tiles first, made cuts second, and laid rows of adhesive next. The first section went very quickly. I let it dry overnight, and started on the grout in the section of tile that I laid the day before. Again, since this was a working kitchen, we were actually trying to live in it during the renovation, I wanted to lay tiles and grout them and move on to the next section.
Float the grout at a 45 degree angle across the tiles and fill all spaces. Unsightly bubbles will surface if the grout is too wet, and if that is the case, it will have to dry and go back for a second grout coat or touch up. I used a 1/8 of an inch grout space which was challenging to push the grout into the gaps. The final challenge with the grout proved to be the cleaning. I had to clean light enough not to pull the grout out of the spaces and hard enough to clean the grout out of the divots on the tiles.
Finally, I used a matching sanded grout calk between the tiles and the granite and the tiles and the wall. These areas receive a lot of expansion and contraction, they also may get wet so they provide a waterproof, flexible seal between the tile and the granite. This is a very tricky and messy product, so having wet paper towels and working with a wet finger on the bead of calk is the best advice I can give. The calk product does not cover very much square footage, so buy more than you think you will need. See the pics of the finished project!
DIY project cost: $500 tile and materials.
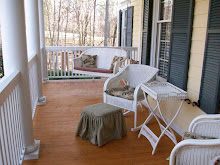
Refinishing the Front Porch
The farmhouse porch was in need of something, it was your typical painted porch in the typical grey porch paint. Ours was painted a "light grey" and showed every dead bug, spider, foot print, and debris. In the spring, it gets a covering of pollen and it would turn completely yellow. I felt like I had to sweep it in a feng shui kind of way, sweeping out the bad spirits, like twice a day.
I brought a decking contractor out to take a look at it, give me some recommendations and ultimately give me a price for doing "something" with it. I suggested stripping it and staining it, and he shook his head and said, "Nah, just calk it and paint it, it looks fine. Just needs some paint". He obviously didn't want the job and he didn't even offer me a price.
With a bucket of bleach and a scrub brush I set to prepping the porch for a coat of paint. I could tell that there were not THAT many coats of paint on the porch, the house is only 12 years old, but there were a few and the shades were many. I noticed a golden wood underneath the chip marks, and my imagination went to work. Wouldn't the porch look beautiful with a naturally stained wood?
I began working in a small area to see what I could uncover with some sand paper and some stripper. The wood was in very good condition, no rot, and a great color. I expanded my area working on the stripper and thought, this is really a huge undertaking.
A different contractor for my master bath arrived to work on a different project and saw what I was doing, it was almost spiritual. He said he had a porch he just refinished and he used a belt sander to take of 100 years of paint off and that he was then able to repaint the porch and completely restore it.
A quick search on the internet for porch refinishing proved nothing, which is another reason why I'm writing this blog. I did learn that I have a "tongue and groove untreated pine porch", but no suggestions surfaced on exactly what I should do with this. The porch is about 4 feet wide and not really wide enough for a belt sander so I explored other options.
I needed a sander I could handle and not take me for a spin. I decided on an orbital sander, found a local equipment rental place. It cost me about $50 a day to rent the sander and a little extra for sand paper, all available at the rental company. I refuse to be intimidated by men or be uncomfortable in a "man place" like the rental company. I definitely got a bit of attention, asked questions like they wanted me to, and they even loaded the equipment into my car. When I feel the discomfort coming on, I tend to talk in "we's" like my husband sent me to get this and I have no idea what I'm doing. It works every time. ;-)
Using a 60 grit sand paper, the sander was very user friendly. It wasn't too heavy for me to handle, but it was a lot of time on my knees. The sander easily got as close as I needed it to up against the columns and around the exterior wall of the house working with the grain of the wood. I had to be careful to keep the sander moving back and forth or the result was uneven sanding, heavy divots in some areas.
The outside framing of the porch that is exposed to the elements is pressure treated. Removing the paint showed beautiful untreated pine, and then "green" treated pine. I hadn't expected this, as well as not being able to get all the paint out of the grooves of the floor. All in all I was pleased with the removal process and my ability to get that part done!
Next came choosing a finish for the floor. Of course, on the Internet everyone offers up their own favorite product. I use Sherwin Williams products, so I went for a natural toner in an oil base for the untreated area. It gave the most natural look with uv protection and water resistance. A word of caution though, it was very ORANGE when first applied. It has since faded a bit and is more natural looking. Also the oil based product will allow me to go back and do touch ups as needed without again restaining the entire floor.
As for the pressure treated framing, I used a solid brown Sherwin product that has very high ratings on uv Resistance and is completely waterproof. The result is a nice two tone look. As for the leftover grey paint in the groves of the floor, I secretly painted over them with a coordinating brown paint. It gave the floor a worn, rustic look and covered imperfections and knots that had paint deep down in them. Finally, I used a clear silicone to seal gaps in the floor and between the floor and the framing, around the columns and against the house in an effort to keep the floor from getting wet, warping or rotting. I also had to do some touch up on the house where the sander bumped it.
And now the porch is one of my favorite places to be. The deck contractor came back, he admired my job on the porch, and he asked for more business from me and I thought "no, I think I'm good, thanks!" ;-)
Project cost: $250 for materials
Wednesday, January 28, 2009
Dangling. Dangerously.
No wonder I saved painting the vaulted walls until nearly last. I fear the ladder.
I've been on this ladder a ton times as a step ladder. I've painted the inside of my whole house on this step ladder. It is a handy extension ladder that has a step ladder feature when folded in half, it extends out to a full size ladder. It has enormous bolts that lock the ladder in place for safety. It also folds away nicely and stores in the garage in about a 4ft space. It is a heavy duty homeowner ladder.
Something is entirely foreboding about this ladder when used as an extension ladder. I'm a visual person, so I see this ladder and I think back to all the shows I've watched on the home improvement networks..."have I ever seen anyone on those shows on a ladder higher than about 6 feet?" Obviously, "no", I do not ever recall anyone being filmed on a high ladder.
I seriously contemplate calling in a professional painter, because I'm thinking that it would be entirely worth paying whatever a professional would charge to finish painting this wall. That thought is quickly erased when I think about the embarrassment I would feel calling on a professional for "cutting in" a wall that is 99% complete.
It literally takes me two hours to arrange this ladder so I feel confident enough to climb up about 14 feet to "cut in" the line between the ceiling and the wall. I shake it, I slide it, I try to wedge it from sliding on the hardwood floors. In my mind I'm calculating the slope of the ladder, my weight, the weight of the ladder, the distance the ladder could fall...none of these physics I actually "know" it is more like a guestimation of what could happen.
I take two steps up, then two more, and realize, I don't have paint or a brush for that matter and how am I going to hold a paint container, a brush, and the ladder? I gather my brush, a small paint container, change my Ugg slippers into sneakers, I say a quick prayer, and slowly make my way up the ladder thinking all the while...thank God my husband is working upstairs, Hopefully, he will hear me fall and call 911.
I don't think I mentioned the time I actually fell from a ladder, thus my fear. I had no fear until my fear was "learned" so to speak. I was hanging some blinds in a previous house when I slipped, tripped, lost my grip and I don't really know what happened but I hit the floor square on my bum. I only actually fell three feet off the step ladder and I don't know what made me fall in the first place, I just know it hurt and I know I was all alone.
Now that the one vaulted wall is 99.9% complete, the day is done. I could wring out my socks from nervous sweat and I need a shower because I smell of fear. It is almost time to start on the adjacent wall. I'll let you know how it goes.
Here's what I discovered today...
Being on a ladder is no joke, either have someone hold it or be a witness to your stupidity.
Subscribe to:
Posts (Atom)